Wednesday, December 14, 2016

Netapp Disk firmware Update Step by Step Guide in Cluster Mode - Cmode

Netapp disk firmware update is an very easy and straight forward. As many of the people think that disk firmware update need an downtime.?? :) No disk firmware update Netapp cluster mode does required any downtime, it's an non-disruptive update. Disk firmware update will go in background.

Disk firmware update Netapp Cluster Mode Advantages

  • Reduce disk failures
  • Increase I/O performance
  • Resolve if any bugs in existing firmware version

1 Step: Verify disk firmware version in controller and Netapp site

To Verify disk firmware version and disk owner ship use below command in Netapp Cluster mode. 
 
 
ARK-NA::*> storage disk show
                     Usable           Disk    Container   Container
Disk                   Size Shelf Bay Type    Type        Name      Owner
---------------- ---------- ----- --- ------- ----------- --------- --------
1.10.0               1.62TB    10   0 BSAS    aggregate   root_ARK_NA02
                                                                    ARK-NETAPP
1.10.1               1.62TB    10   1 BSAS    aggregate   root_ARK_NA02 
 
                                                                    ARK-NETAPP
ARK-NA::*> storage disk show -physical
Disk             Type    Vendor   Model                Revision     RPM     BPS
---------------- ------- -------- -------------------- -------- ------- -------
1.10.0           BSAS    NETAPP   X306_HMRKP02TSSM     NA00        7200     512
                 SerialNumber: P5G9XX7YX
1.10.1           BSAS    NETAPP   X306_HMRKP02TSSM     NA00        7200     512

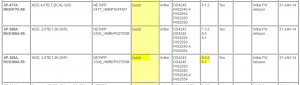
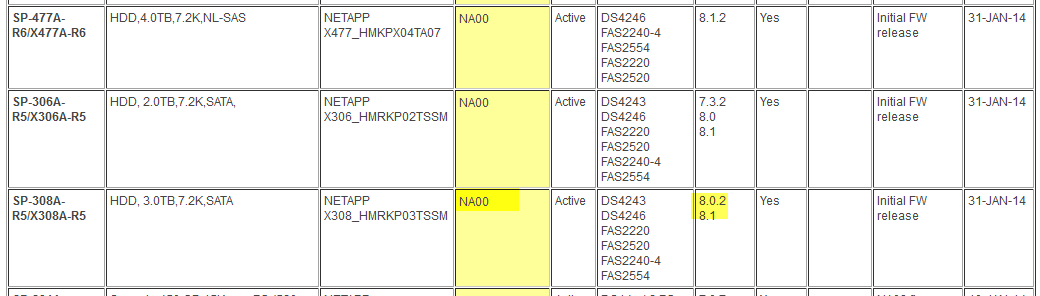
Take the model number from above command output and search in Netapp disk firmware list, URL is given below.

http://mysupport.netapp.com/NOW/download/tools/diskfw/ Click Here
 
disk firmware version check up in Netapp support site

Download required version of disk firmware from Netapp site and copy into your local web server path (which should accessible to Netapp controller). In this case i have used an Linux machine with httpd enabled.

2 Step: Enable Background update option in Netapp

Enabling background firmware update option will save you lot of time and effort, if you want to do manually then need to do one by one disk. Background firmware update will automatically do it for you.

ARK-NA::*> storage disk option show -fields bkg-firmware-update
node     bkg-firmware-update
-------- -------------------
ARK-NA01 on
ARK-NA02 on
ARK-NA03 on
ARK-NA04 on
4 entries were displayed.

3 Step: Download firmware to Netapp controllers

First download Netapp firmware from netapp website and upload it to http / web enabled server, ready with web URL.

Login to Cluster mode controller then type below command to download the firmware, in place of existing URL change URL to your own. In command instead of node name use * will download firmware zip file to all of the nodes.
 
ARK-NA::*> storage firmware download -node * -package-url http://192.168.26.118/X425_HCBEP1T2A10.NA01.LOD.zip
Firmware download started.
Unpacking package contents.
Firmware downloaded.

Firmware download started.
Unpacking package contents.
Firmware downloaded.

Firmware download started.
Unpacking package contents.
Firmware downloaded.

Firmware download started.
Unpacking package contents.
Firmware downloaded.

4 entries were acted on.

That's it, Netapp background disk firmware update will start automatically after 2 minutes. you can see disk firmware update status using below command.
 
ARK-NA::>storage disk show -fields firmware-revision,model

Conclusion: Disk firmware update in Netapp cluster mode not required any down time. It's completely non-disruptive.

How to replace failed disk
 
SEO Keywords: disk shelf firmware upgrade netapp, netapp disk firmware update status, netapp disk firmware update command, netapp disk firmware update background, netapp disk firmware update problem, netapp disk firmware update non disruptive, netapp check disk firmware update status, netapp automatic disk firmware update, netapp cluster disk firmware update, netapp disk shelf firmware update, disk firmware update netapp, netapp disk firmware auto update, netapp disk drive firmware update, netapp force disk firmware update, how to update disk firmware netapp, disk firmware update in netapp, netapp manual disk firmware update, update firmware on netapp disk, netapp disk firmware update state, disk firmware update netapp cluster mode

Tuesday, August 23, 2016

Netapp Basic Commands Getting Started with Cluster Mode

Netapp Basic commands getting started with cluster mode, If we look into the previous Netapp 7-mode there is no Option to Clear all the commands typed on screen and change directory path from one to another without changing the privilege from admin to Advanced. 

Change Directory cd Command
Cluster::> cd dashboard
Cluster::> cd volume
Cluster::> cd "storage aggregate"

 History of Previously executed commands
Cluster::> history
1 cd dashboard
2 cd volume
3 cd "storage aggregate"  
Cluster::> redo 2 

history is the command to see the history of previously executed commands and redo is the command to execute the previously executed command number 2

 Clear Screen
To clear the screen of cluttered with commands and commands output just press CTRL+L

Instantly getting help from Netapp Command Line

Suddenly struck up in middle of the task because did not remember the command need help use inbuilt man pages to get help from command line. 

Cluster::> man storage aggregate

Rows to Display in CLI session

Show/Set the rows for CLI session using rows command

Cluster::> rows 45

Above command will set the CLI session display as 45 rows. 

Run commands interactively Or non-interactively 

Cluster::>  run -node node1 -command "aggr status; vol status"

Using above command we can run commands on nodeshell interactively Or non-interactively. Above command will show aggregate status and Volume status yet the same time on node1 system.

Change Privileges as per the requirement

Using set command we can change the privilege level 

1. Privilege as Advanced
2. Privilege to admin
3. Privilege as Diag

Cluster::> set -privilege advanced 

Note: Until unless you have a compulsary requirement in advanced mode then only using above command, Strictly not required for normal usage.

Cluster::> set diag

Diagnostic log collection or performance deep digging we can use above command

Cluster::> set admin

Setting as Admin we can come from diag and advanced mode to admin mode

TOP command

top command is used to change from any level directory path to direct top which means out of directory path.

Cluster::> cd network interface
Cluster:: interface> top

UP Command

Using up command one step directory path will go to up.

Cluster::> cd  storage aggregate

Cluster:: aggregate> up

Cluster:: storage>

Exit from CLI Session

We can also use exit command to exit from CLI session also we can press CTRL + D


That's it about Basic Commands Getting Started with Cluster Mode Netapp.

Related Articles You can Read

Aggr command Netapp Cluster Mode

Move Volume from One SVM to Another SVM


Monday, August 22, 2016

Netapp NFS Issues Troubleshooting tips and steps Ultimate Guide

# NFS troubleshooting

Problem1: Stale NFS File handle

Sample Error Messages - NFS Error 70

Error Explanation:

A “stale NFS file handle” error message can and usually is caused by the following events:
  1. A certain file or directory that is on the NFS server is opened by the NFS client
  2. That specific file or directory is deleted either on that server or on another system that has access to the same share
  3. Then that file or directory is accessed on the client
  A file handle usually becomes stale when a file or directory referenced by the file handle on the client is removed by another host, while your client is still holding on to an active reference to that object.

Resolution Tips

  • Check connectivity to the storage system (server)
  • Check mount point
  • Check client vfstab or fstab as relevant
  • Check showmount –e filerx from client
  • Check exportfs from command line of the storage system
  • Check storage system /etc/exports file

Problem2: NFS server not responding

NFS Server (servername) not responding

Error Explanation: NFS client hangs, mount hangs on all clients

Resolution Tips

  • Use ping to contact the hostname of the storage system (server) from client
  • Use ping to contact the client from the storage system
  • Check ifconfig from the storage system
  • Check that the correct NFS version is enabled
  • Check all nfs options on the storage system
  • Check /etc/rc file for nfs options
  • Check nfs license

Problem3: Permission denied

nfs mount: mount: /nfs: Permission denied

Error Explanation: Permission is not there but trying to access NFS share from server

Resolution Tips

  • Check showmount –e filername from client
  • Try to create a new mountpoint
  • Check exportfs at the storage system command line to see what system is exporting
  • Check auditlog for recent exportfs –a
  • Check the /etc/log/auditlog for messages related to exportfs
  • Check the storage path with exportfs –s
  • Check whether the client can mount the resource with the exportfs –c command
  • Flush the access cache and reload the exports, then retry the mount

Problem4: Network Performance Slow

Poor NFS read and/or write performance

Error Explanation: End user is feeling the slowness

Resolution Tips

  • Check sysstat 1 for nfs ops/sec vs. kbs/sec
  • Check parameters on network card interface (NIC) with ifconfig –a
  • Check netdiag
  • Check network condition with ifstat –a; netstat –m
  • Check client side network condition
  • Check routing table on the storage system with netstat
  • Check routing table on the client
  • Check perfstat.sh
  • Check throughput with sio_ntap tool
  • Check rsize and wsize
  • Consider configuring jumbo frames (entire path must support jumbo frames)

Problem5: RPC not responding

RPC: Unable to receive or RPC:Timed out

Resolution Tips

  • Use ping to contact the storage system (server)
  • From storage system, use ping to contact client
  • Check mountpoint
  • Check showmount –e filerX from client
  • Verify name of directory on the storage system
  • Check exportfs to see what the storage system is exporting
  • Use the "rpcinfo -p filerx" command from the client to verify that the RPCs are running

Problem6: No Space Left On Disk

No space left on disk error

Resolution Tips

  • Check df for available disk space
  • Check for snapshot overruns
  • Check quota report for exceeded quotas

Write Your Valuable Comments ..................

Saturday, January 30, 2016

password less SSH connection to Clustered Data ONTAP using Key

password less SSH connection to Clustered Data ONTAP using Key

Basically " password less SSH connection to Clustered Data ONTAP using Key " means without typing username and password we have to login to the remote machine using SSH protocol. Now we think is it not a security thread? when SSH is login to remote machine with credentials, No it is not a security thread it is feature instead of using credential (username and password) we are using key bits to login remote machine.

This key based authentication is more useful when we run a script an remote machine, always you have to type a remote machine password in order to execute the script an remote machine,  but if a script is scheduled using any automated task scheduler then you may not available yet that point of time script will not execute. In order to  overcome this issue we will generate an ssh public-key and  attach same key to remote machine, it will not ask you credential until you have not changed your key.

Note: Generated ssh key file should be in restricted mode.

STEP 1 :-

Let's see how to generate an SSH key in Linux / UNIX machine.

[root@arkit71 ~]# ssh-keygen -t rsa    <<--- Command to Generate Key -->>  Generating public/private rsa key pair.  Enter file in which to save the key (/root/.ssh/id_rsa):  Created directory '/root/.ssh'.  Enter passphrase (empty for no passphrase):  Enter same passphrase again:  Your identification has been saved in /root/.ssh/id_rsa.  Your public key has been saved in /root/.ssh/id_rsa.pub.  The key fingerprint is:  8e:c3:89:36:5d:75:b4:3f:53:04:cc:44:3a:eb:e0:b4 root@arkit71  The key's randomart image is:  +--[ RSA 2048]----+  | .=+..|  | . oo. |  | . = .|  | . . + . |  | S o . + |  | + = o + o |  | + * . E . |  | . . . |  | |  +-----------------+

After generating the key the default key path is ~.ssh/id_rsa.pub is the file.

in order to see your key

[root@arkit71 ~]# cat .ssh/id_rsa.pub  ssh-rsa AAAAB3NzaC1yc2EAAAADAQABAAABAQDPjUlxj742pPHBKcyD8CtZWAez9o90OA62Xie2gNnlHXu0XRD3Rp59KJPElVx32UMm3InSL0UKOFwnTFtDFzQ690FwocD24da9wzeI2cQP4jDB7IIeUCXtvHzzhY10FeztRBm0bd5U43n5mHXDLYy02lf8BhFs3ptJi699kWlwa+2KylU5KGiKv3v0DWYT0e6A/Rhs9TsIVvLcUVed1Ckzuz7lrimyOZNwgN83cln2Sfnv+ALCQ4U2UyStIgkRyuXA9wshFR26hDZpCltwCSlWq1mBvaJ0+sz6aUQ944ojtgVjpfinAeeD2QElcC8p2V7O357BXuS6tapqee/+BiNv root@arkit71

Now we have generated the key, the same key we are going to use for authentication

STEP 2 :-

Connect to Netapp using your SSH protocol

create user with authentication type is publickey

cDOT::> security login create -user-or-group-name ravi -authmethod publickey -application ssh -role admin -vserver cDOT  Warnning: To use public-key authentication, you must create a public key for user "ravi".    cDOT::> security login publickey create -username ravi -index 0 -publickey "ssh-rsa AAAAB3NzaC1yc2EAAAADAQABAAABAQDPjUlxj742pPHBKcyD8CtZWAez9o90OA62Xie2gNnlHXu0XRD3Rp59KJPElVx32UMm3InSL0UKOFwnTFtDFzQ690FwocD24da9wzeI2cQP4jDB7IIeUCXtvHzzhY10FeztRBm0bd5U43n5mHXDLYy02lf8BhFs3ptJi699kWlwa+2KylU5KGiKv3v0DWYT0e6A/Rhs9TsIVvLcUVed1Ckzuz7lrimyOZNwgN83cln2Sfnv+ALCQ4U2UyStIgkRyuXA9wshFR26hDZpCltwCSlWq1mBvaJ0+sz6aUQ944ojtgVjpfinAeeD2QElcC8p2V7O357BXuS6tapqee/+BiNv root@arkit71"

As per your environment change -vserver <name> and <User Name>

STEP 3 :-

Check the status of your public key attached to user ravi, in order to check the status use below command

cDOT::> security login publickey show -username ravi    Vserver: cDOT  UserName: ravi   Index: 0  Public Key:  ssh-rsa AAAAB3NzaC1yc2EAAAADAQABAAABAQDPjUlxj742pPHBKcyD8CtZWAez9o90OA62Xie2gNnlHXu0XRD3Rp59KJPElVx32UMm3InSL0UKOFwnTFtDFzQ690FwocD24da9wzeI2cQP4jDB7IIeUCXtvHzzhY10FeztRBm0bd5U43n5mHXDLYy02lf8BhFs3ptJi699kWlwa+2KylU5KGiKv3v0DWYT0e6A/Rhs9TsIVvLcUVed1Ckzuz7lrimyOZNwgN83cln2Sfnv+ALCQ4U2UyStIgkRyuXA9wshFR26hDZpCltwCSlWq1mBvaJ0+sz6aUQ944ojtgVjpfinAeeD2QElcC8p2V7O357BXuS6tapqee/+BiNv root@arkit71  Fingerprint:  a9:b8:10:22:55:i0:99  Bubbleabble Fingerprint:  Comment:

above is the sample output

STEP 4 :-

Verify by connecting the Netapp Filer from your Linux machine which will not ask username and password

[root@arkit71 ~]# ssh ravi@192.168.91.11    cDOT::>

That's it..!! password less SSH connection to Clustered Data ONTAP using Key password less SSH connection to Clustered Data ONTAP using Key password less SSH connection to Clustered Data ONTAP using Key

Your publickey authentication is created using key. For 7-Mode Click Here

Please write your feedback…