Monday, October 19, 2015

Creating and Managing snapshot - Netapp

Guidelines for creating Snapshot copies of Infinite Volumes

  1. The volume must be online. You cannot create a Snapshot copy of an Infinite Volume if the Infinite Volume is in a Mixed state because a constituent is offline.
  2. The Snapshot copy schedule should not be less than hourly. It takes longer to create a Snapshot copy of an Infinite Volume than of a FlexVol volume. If you schedule Snapshot copies of Infinite Volumes for less than hourly, Data ONTAP tries but might not meet the schedule. Scheduled Snapshot copies are missed when the previous Snapshot copy is still being created.
  3. Time should be synchronized across all the nodes that the Infinite Volume spans. Synchronized time helps schedules for Snapshot copies run smoothly and restoration of Snapshot copies function properly.
  4. The Snapshot copy creation job can run in the background. Creating a Snapshot copy of an Infinite Volume is a cluster-scoped job (unlike the same operation
    on a FlexVol volume). The operation spans multiple nodes in the cluster. You can force the job to run in the background by setting the -foreground parameter of the volume snapshot create command to false
  5. After you create Snapshot copies of an Infinite Volume, you cannot rename the copy or modify the comment or SnapMirror label for the copy.

Guidelines for managing Snapshot copy disk consumption

  • You cannot calculate the amount of disk space that can be reclaimed if Snapshot copies of an Infinite Volume are deleted.
  • The size of a Snapshot copy for an Infinite Volume excludes the size of namespace mirror constituents.
  • If you use the df command to monitor Snapshot copy disk consumption, it displays information about consumption of the individual data constituents in an Infinite Volume—not for the Infinite Volume as a whole.
  • To reclaim disk space used by Snapshot copies of Infinite Volumes, you must manually delete the copies.
You cannot use a Snapshot policy to automatically delete Snapshot copies of Infinite Volumes. However, you can manually delete Snapshot copies of Infinite Volumes, and you can run the delete operation in the background

Create Snapshots

Syntax: snap create [-A | -V] <volume name> <snap shot name>
ARK> snap create -V vol0 testingsnap          #### for volume level snapshot creation
ARK> snap create -A aggr0 testingsnap     #### for aggregate level snapshot creation
in above scenario ‘snap create’ is a command to create snapshot.
‘-V’ is a option to create snapshot in volume level.
‘vol0’ is the volume name.
‘testingsnap’ is the snapshot name.

Rename Snapshots

Syntax: snap rename [-A | -V] <volume Name> <Old-snap name> <New snap Name>
ARK> snap rename -V vol0 testingsnap realsnap     #### Renaming Volume level snapshot
ARK> snap rename -A aggr0 testingsnap realsnap #### Renaming Aggregate level snapshot

Snap reserve space

Syntax: snap reserve [-A | -V] <volume Name> <percentage>
ARK> snap reserve -V vol0       ### verify volume reserve snap percentage
ARK> snap reserve -V vol0 20      ### Change snap reserve space to 20%

Snap Delete

Syntax: snap delete [-A | -V ] <volume Name> <snapshot name>
ARK> snap delete -V vol0 realsnap      ####Deleting vol0 realsnap snapshot

snap reclaimable size

Syntax: snap reclaimable <volume name> <snapshot Name>
ARK> snap reclaimable vol0 snapshot1
snap reclaimable: Approximately 780 Kbytes would be freed.

Snap Restore

ARK> snap restore -V -t vol -s snapshot1 vol1
above command will restore entire volume. before restoration it will ask you for the confirmation.

snap autodelete

snap autodelete is the option we have to to delete old snapshots automatically.
ARK> snap autodelete vol1 show
ARK> snap autodelete vol1 on
ARK> snap autodelete vol1 off
Lets see all detailed explanation about snapshots


Please provide your valuable comments....

Saturday, October 17, 2015

Enable SSH from ESX to Netapp - Automation

SSH from ESX to Netapp

By default, the SSH configuration on VMware ESX Server only supports AES encryption types (specifically, AES-256 and AES-128). If you need SSH connectivity from ESX Server to a Network Appliance storage system running Data ONTAP, you’ll need to modify this to support 3DES.
This kind of connectivity would be necessary if you were interested in running scripts on ESX Server that connected to the NetApp storage system via SSH to run commands (for example, to initiate a snapshot via the command line).
To modify the ciphers supported by ESX Server, edit the /etc/ssh/ssh_config file and change this line:
ciphers aes256-cbc,aes128-cbc
Instead, it should look like this:
ciphers aes256-cbc,aes128-cbc,3des-cbc
This will enable SSH connections from ESX Server to find a compatible cipher with the SSH daemon running in Data ONTAP. Note that we change the SSH configuration on ESX Server because, as far as I know, the ciphers supported by the SSH daemon in Data ONTAP are not configurable by the user.
Note that you’ll also need to enable SSH traffic through the ESX firewall:
esxcfg-firewall -e sshClient
And, of course, you’ll need to configure and enable SSH access on the Network Appliance storage system itself using the secureadmin command in Data ONTAP:
secureadmin setup ssh
secureadmin enable ssh2
Once SSH is reconfigured on ESX Server and configured/enabled in Data ONTAP, then using SSH to run commands remotely from ESX Server to the NetApp storage system should work without any problems. For complete automation, you’ll also want to setup SSH shared keys as well, but I’ll save those details for a future article.

Calculating Usable and RAW Disk Space

Calculate usable disk space
You use the physical and usable capacity of the disks you employ in your storage systems to ensure that your storage architecture conforms to the overall system capacity limits and the size limits of your aggregates.

To maintain compatibility across different brands of disks, Data ONTAP rounds down (right-sizes) the amount of space available for user data. In addition, the numerical base used to calculate capacity (base 2 or base 10) also impacts sizing information. For these reasons, it is important to use the correct size measurement, depending on the task you want to accomplish:
  • For calculating overall system capacity, you use the physical capacity of the disk, and count every disk that is owned by the storage system.
  • For calculating how many disks you can put into an aggregate before you exceed its maximum size, you use the right-sized, or usable capacity of all data disks in that aggregate.
    Parity and dparity disks are not counted against the maximum aggregate size.

Using Disk Space Calculator

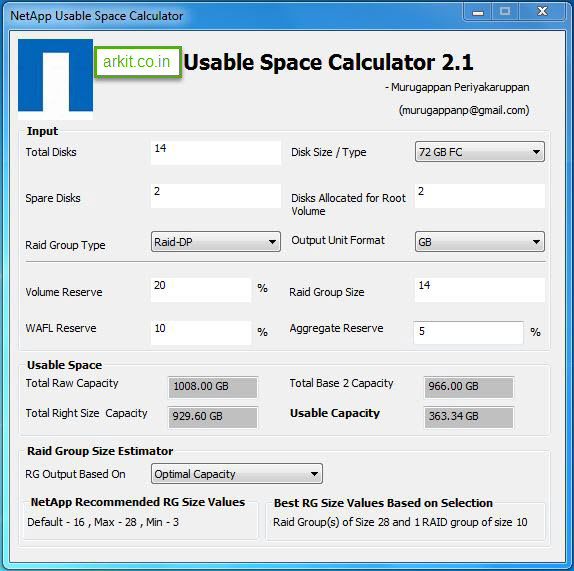
You can also calculate your raw and usable disk space using this software. Download Software
Also this includes a new feature called Raid Group Size Estimator where you key in disks values, raid type and disk type – the software will attempt to provide the best RG size values either based on NetApp recommendations or Optimal Capacity.(Please note: The Raid group size input in the calculator is only for disk space calculations and this is ignored for the raid group estimator)
I have developed this Raid Group Size Estimator based on many users request. As usual please provide feedback if you do some testing.

Screenshot of new version 2.1 (Software zip attached to this post)
Disk space calculator


Please provide your valuable comments